The Tree ribbon was inspired by a William Morris tapestry entitled Woodpecker. I added the blue spruce to bring in that beautiful blue green acanthus leaves Morris used.


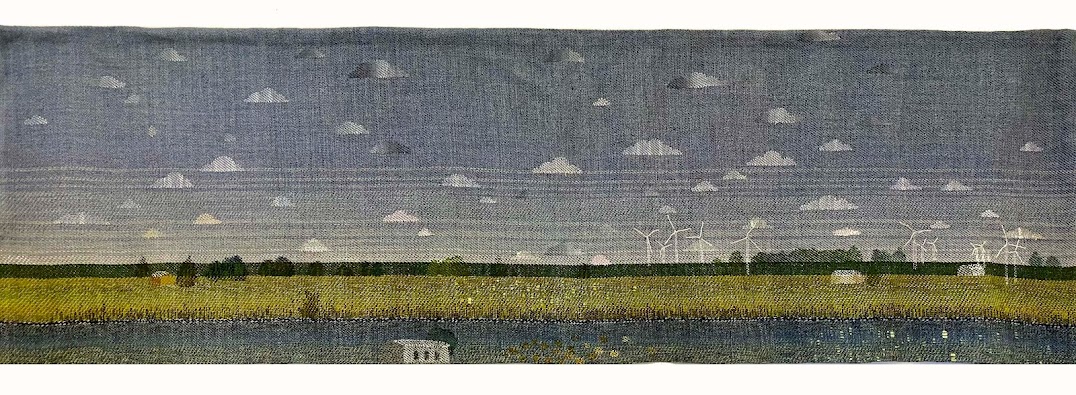
Handwoven Tapestries, Textile Design
 I am a studio artist and textile designer. My work swirls around among art, design, and the joy of making things.
I founded LFN Textiles Artists Ribbons in 2002, and have been designing these fairly wonderful ribbons for 8 years now. They are distributed for the wholesale market exclusively by Renaissance Ribbons, and are available at retail on my website, www.lfntextiles.com, and nationwide through fine fabric stores, gift shops.
My tapestries are available through a number of galleries across the country as well. See the links section for contact information.
I am a studio artist and textile designer. My work swirls around among art, design, and the joy of making things.
I founded LFN Textiles Artists Ribbons in 2002, and have been designing these fairly wonderful ribbons for 8 years now. They are distributed for the wholesale market exclusively by Renaissance Ribbons, and are available at retail on my website, www.lfntextiles.com, and nationwide through fine fabric stores, gift shops.
My tapestries are available through a number of galleries across the country as well. See the links section for contact information.
 This is the photo, by Kelly McKaig, that inspired Anna to do the drawing in the last post. The ribbons shown here are How to Knit (similar to my more recent Knit Wit ribbon) and Manikin. I sewed the ribbons into cloth bookcovers, made much the same way I used to cover books in folded brown paper (re-cycled grocery bags!) when I was a school girl.
I am a studio artist and textile designer. My work swirls around among art, design, and the joy of making things.
I founded LFN Textiles Artists Ribbons in 2002, and have been designing these fairly wonderful ribbons for 8 years now. They are distributed for the wholesale market exclusively by Renaissance Ribbons, and are available at retail on my website, www.lfntextiles.com, and nationwide through fine fabric stores, gift shops.
My tapestries are available through a number of galleries across the country as well. See the links section for contact information.
This is the photo, by Kelly McKaig, that inspired Anna to do the drawing in the last post. The ribbons shown here are How to Knit (similar to my more recent Knit Wit ribbon) and Manikin. I sewed the ribbons into cloth bookcovers, made much the same way I used to cover books in folded brown paper (re-cycled grocery bags!) when I was a school girl.
I am a studio artist and textile designer. My work swirls around among art, design, and the joy of making things.
I founded LFN Textiles Artists Ribbons in 2002, and have been designing these fairly wonderful ribbons for 8 years now. They are distributed for the wholesale market exclusively by Renaissance Ribbons, and are available at retail on my website, www.lfntextiles.com, and nationwide through fine fabric stores, gift shops.
My tapestries are available through a number of galleries across the country as well. See the links section for contact information.
 Some time ago I asked Anna Brewer, one of the most talented illustrators I know, to do a series of drawings of things to do with the ribbons I design. I will begin posting these charming drawings to share the ideas with you. Mark Your Books -- from using a ribbon as a bookmark to binding it into handmade books. It features several ribbons: Seven-Circuit Labyrinth, Labyrinth, Oranges, and Manikin.
I am a studio artist and textile designer. My work swirls around among art, design, and the joy of making things.
I founded LFN Textiles Artists Ribbons in 2002, and have been designing these fairly wonderful ribbons for 8 years now. They are distributed for the wholesale market exclusively by Renaissance Ribbons, and are available at retail on my website, www.lfntextiles.com, and nationwide through fine fabric stores, gift shops.
My tapestries are available through a number of galleries across the country as well. See the links section for contact information.
Some time ago I asked Anna Brewer, one of the most talented illustrators I know, to do a series of drawings of things to do with the ribbons I design. I will begin posting these charming drawings to share the ideas with you. Mark Your Books -- from using a ribbon as a bookmark to binding it into handmade books. It features several ribbons: Seven-Circuit Labyrinth, Labyrinth, Oranges, and Manikin.
I am a studio artist and textile designer. My work swirls around among art, design, and the joy of making things.
I founded LFN Textiles Artists Ribbons in 2002, and have been designing these fairly wonderful ribbons for 8 years now. They are distributed for the wholesale market exclusively by Renaissance Ribbons, and are available at retail on my website, www.lfntextiles.com, and nationwide through fine fabric stores, gift shops.
My tapestries are available through a number of galleries across the country as well. See the links section for contact information.
 I am a studio artist and textile designer. My work swirls around among art, design, and the joy of making things.
I founded LFN Textiles Artists Ribbons in 2002, and have been designing these fairly wonderful ribbons for 8 years now. They are distributed for the wholesale market exclusively by Renaissance Ribbons, and are available at retail on my website, www.lfntextiles.com, and nationwide through fine fabric stores, gift shops.
My tapestries are available through a number of galleries across the country as well. See the links section for contact information.
I am a studio artist and textile designer. My work swirls around among art, design, and the joy of making things.
I founded LFN Textiles Artists Ribbons in 2002, and have been designing these fairly wonderful ribbons for 8 years now. They are distributed for the wholesale market exclusively by Renaissance Ribbons, and are available at retail on my website, www.lfntextiles.com, and nationwide through fine fabric stores, gift shops.
My tapestries are available through a number of galleries across the country as well. See the links section for contact information.